
工作上使用 Mac 有 iTerm2 + oh my zsh,還有 autosuggestions(解救蒼生 QQ)
雖然家裡 Windows 電腦安裝了 WSL,但有時使用 gcloud、kubectl,會有很慢的問題
PowerShell 又一直覺得難看且不好用 XD,因此搜尋了一下怎麼修改 Windows Terminal
主要是筆記給未來換新電腦的自己,以及分享給有需要的人
修改 font
download Nerd Fonts
解壓縮後找到喜歡的字體,安裝檔名後面是
Windows Compatible.ttf的檔案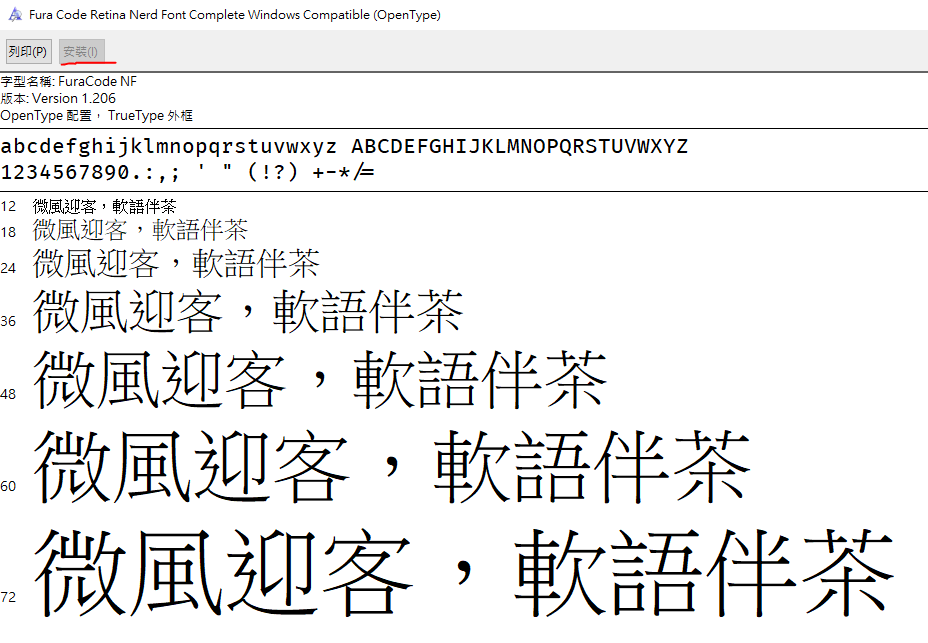
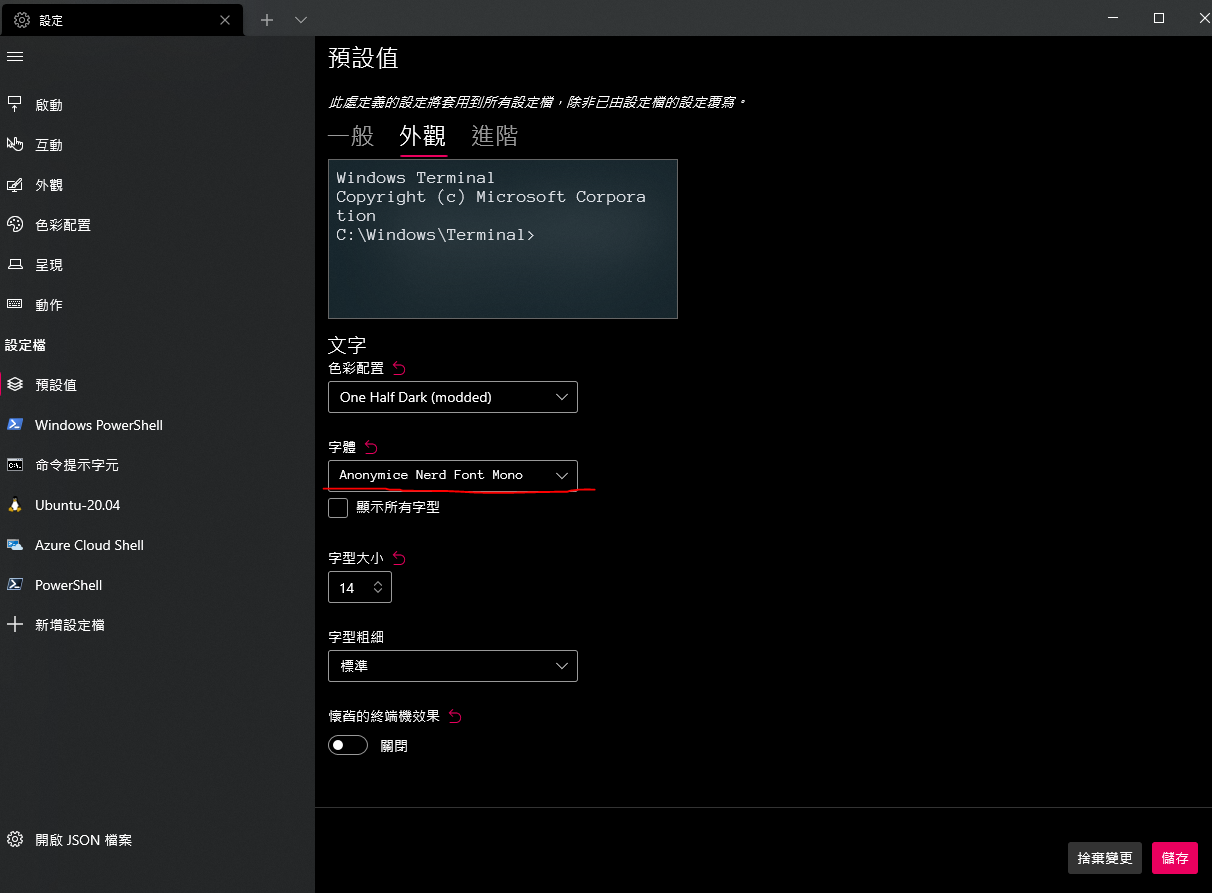
Windows Terminal 更改字體
修改透明度
點開啟
開啟壓克力,並調整透明度
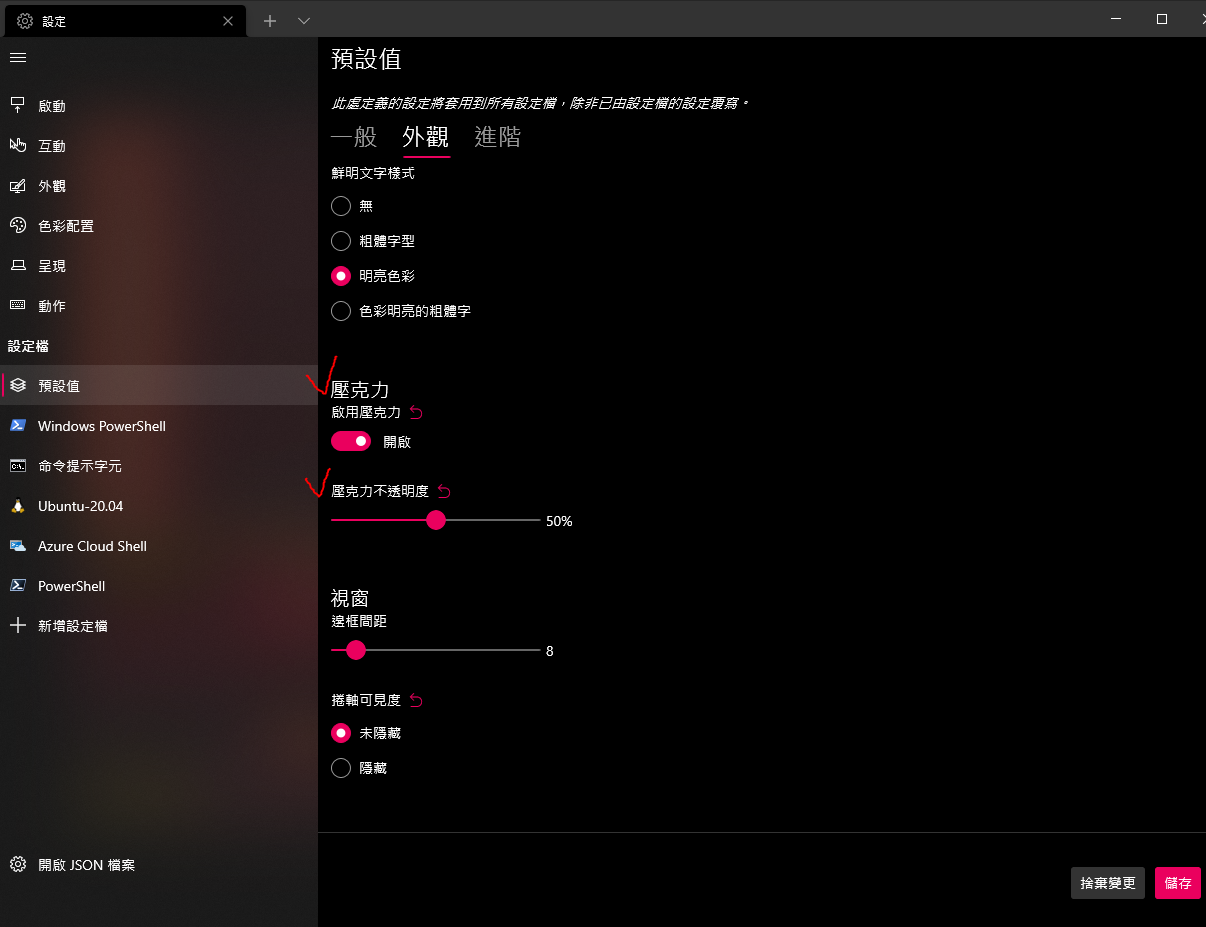
就會看到 terminal 變透明了!
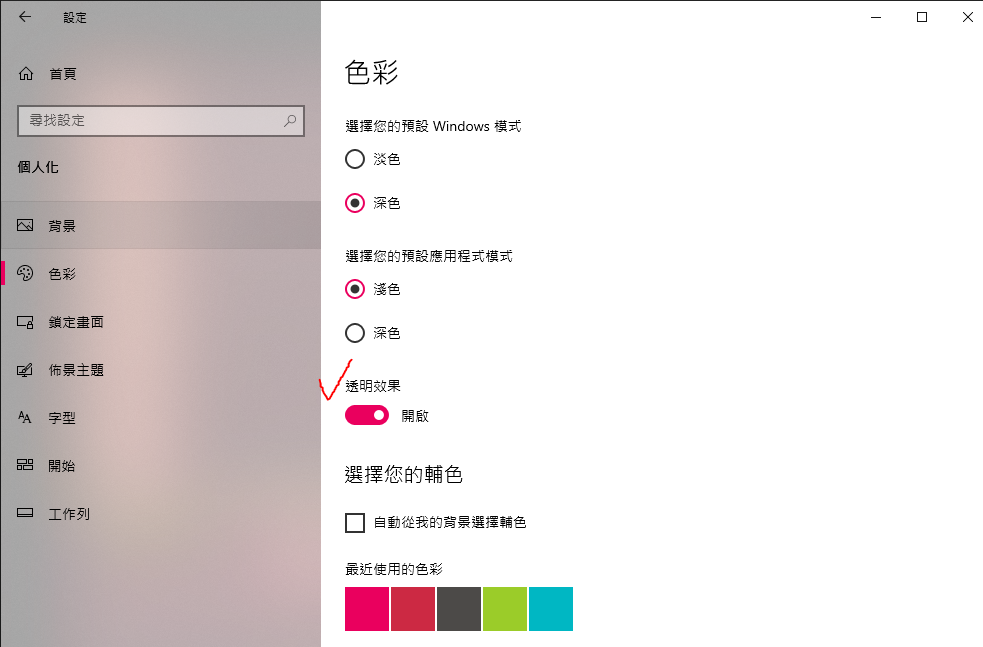
💡 這邊要注意的是,Windows 設定的透明效果要記得開啟,不然 terminal 設定的透明會無效
Install PowerShell
open
Microsoft Storeand findPowerShell
將 PowerShell 改成預設

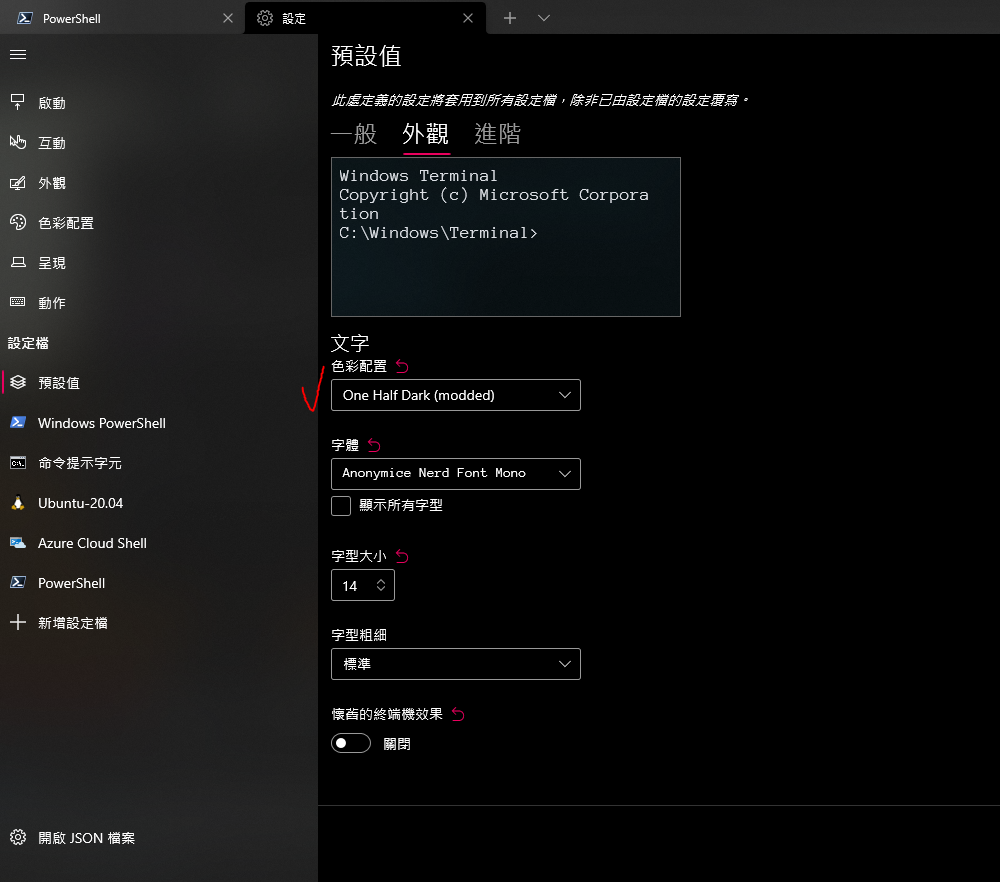
修改 terminal 色彩配置
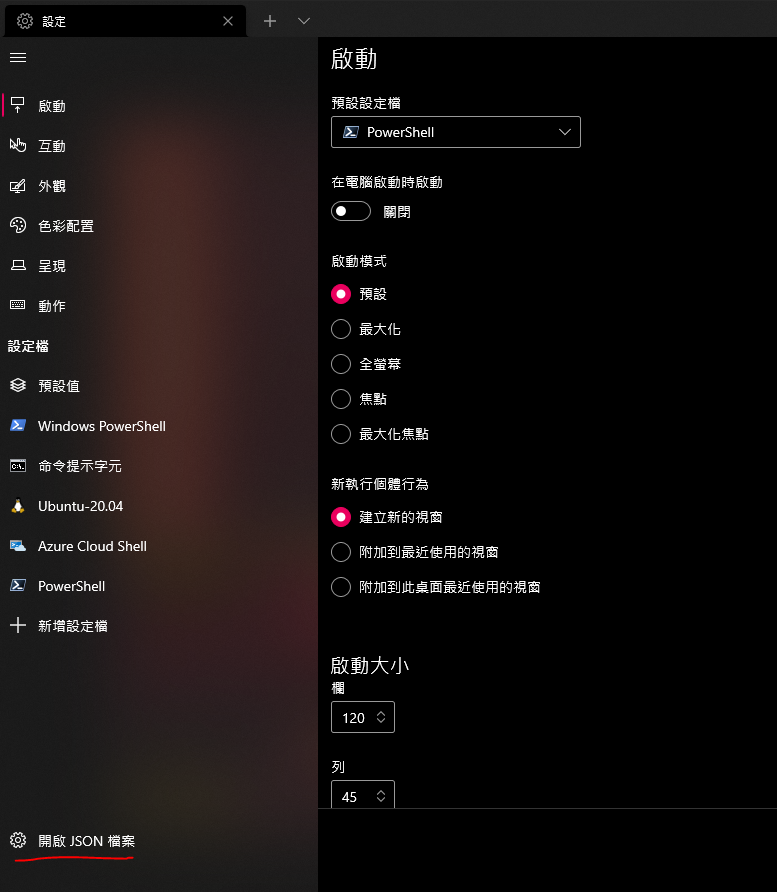
打開 Windows Terminal 設定檔
首先搜尋原本就有的
One Half Dark如下{
"background": "#282C34",
"black": "#282C34",
"blue": "#61AFEF",
"brightBlack": "#5A6374",
"brightBlue": "#61AFEF",
"brightCyan": "#56B6C2",
"brightGreen": "#98C379",
"brightPurple": "#C678DD",
"brightRed": "#E06C75",
"brightWhite": "#DCDFE4",
"brightYellow": "#E5C07B",
"cursorColor": "#FFFFFF",
"cyan": "#56B6C2",
"foreground": "#DCDFE4",
"green": "#98C379",
"name": "One Half Dark",
"purple": "#C678DD",
"red": "#E06C75",
"selectionBackground": "#FFFFFF",
"white": "#DCDFE4",
"yellow": "#E5C07B"
}再複製貼上一個新的,並修改
background&name{
"background": "#001B26", // 修改 background
"black": "#282C34",
"blue": "#61AFEF",
"brightBlack": "#5A6374",
"brightBlue": "#61AFEF",
"brightCyan": "#56B6C2",
"brightGreen": "#98C379",
"brightPurple": "#C678DD",
"brightRed": "#E06C75",
"brightWhite": "#DCDFE4",
"brightYellow": "#E5C07B",
"cursorColor": "#FFFFFF",
"cyan": "#56B6C2",
"foreground": "#DCDFE4",
"green": "#98C379",
"name": "One Half Dark (modded)", // 修改 name
"purple": "#C678DD",
"red": "#E06C75",
"selectionBackground": "#FFFFFF",
"white": "#DCDFE4",
"yellow": "#E5C07B"
}改成剛剛的顏色配置
Install Scoop
- command-line installer for Windows
# install scoop
iwr -useb get.scoop.sh | iex

# install some packages
scoop install curl sudo jq

# check install successfully
curl 'https://api.inkdrop.app/' | jq .
Install NeoVim
# install neovim
scoop install neovim gcc

# check install successfully
nvim
使用 nvim 可能不符合使用習慣,待會會再做修改
Customize PowerShell config file
建立
user_profile.ps1然後編輯cd ~
nvim .config/powershell/user_profile.ps1user_profile.ps1 加入 alias
# Alias
Set-Alias vim nvim
Set-Alias grep findstr
編輯電腦的
$PROFILEnvim $PROFILE.CurrentUserCurrentHost
# 加入這段,讓 $PROFILE 指向自製的 user_profile.ps1
. $env:USERPROFILE\.config\powershell\user_profile.ps1
之後可以試試直接用 vim or grep 測試有沒有成功
Install oh-my-posh
install posh-git and oh-my-posh
Install-Module posh-git -Scope CurrentUser -Force
Install-Module oh-my-posh -Scope CurrentUser -Force
修改
user_profile.ps1cd ~
vim .config/powershell/user_profile.ps1加入
# Prompt
Import-Module posh-git
Import-Module oh-my-posh
Set-PoshPrompt powerlevel10k_lean
之後可能要開新的 terminal session,或是重開 terminal 才會開始安裝,然後會看到新的 theme
Install Terminal-Icons
Install-Module -Name Terminal-Icons -Repository PSGallery -Force

Import-Module Terminal-Icons
Install PSReadline
# install PSReadline
Install-Module -Name PSReadline -AllowPrerelease -Scope CurrentUser -Force -SkipPublisherCheck

# autocompletion
Set-PSReadLineOption -PredictionSource History

# option (config that I don't use)
Set-PSReadLineOption -PredictionViewStyle ListView
Others
測試時 terminal 輸入,就可以看到改變的 theme,確定要用時記得加入
user_profile.ps1Set-PoshPrompt [theme_name]my PowerShell config is here
Reference
主要節錄自這個影片:How to set up PowerShell prompt with Oh My Posh on Windows 11